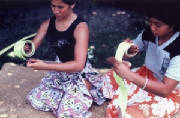
Abel Makekau describes maceration as such. He states that after the Mo'omo'o were made they were laid on
banana leaves and sprinkled with water then‑‑covered with banana leaves. It was left to rot for a week. The Tapa
maker would be always pressing the covering down, and if it should sink the contents were ready to be taken out. She also
tested it by sticking her finger into it and it they went through easily and it was easy to tear, the banana leaves were taken
off and the mo'omo'o taken out to be kneaded. Each mo'omo'o was torn, rolled and pressed and the mass made into a round cake.
At first it resembled soaked paper, but by kneading, it became as tough as dough. This done, a cake was taken to the Kua (wooden
anvil) and laid upon it to be beaten.
Kaahaaina continues to describe
the next process as felting or ..Each mo'omo'o loosely coiled and when flattened out was about 6 inches long. It was not unrolled.
Due to wetting and maceration it appeared like a small mass of pulp. Any slimy water was squeezed from it. It was then laid
on the Kua and beaten with the pepehi side of the I’e kuku(wooden beater‑grooved side). During the beating the
pulpy material spread in all directions, as it spread the edges were turned back from one side to another. This was done as
the beating continued, similar to rolling dough for pastry. As a result the fibers became turned in all directions and a very
complete felting (palahe) resulted. The name of the material at this stage was called mo'omo'o hana. After initial felting
as it began to spread and
Became sheet like, it was termed
u'au'a and the edges were not
turned back again at this stage.
At this stage the sheet was given its shape not its size. 'U'a is the term for a coarse mat or tapa according to Mary Pukui.
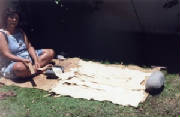
At this stage the beaten
bast was taken out to the drying yard. This can be on your lawn or on a pavement. The bast must be weigh down with stones
at the margins and left in the sun to dry. When the bast is dried it is called Mo'omo'o and can be stored till enough is obtained
for the article desired. If you are going to store it for a long period of time it is best to air it out in the sun every
now and then, especially after humid or rainy weather.
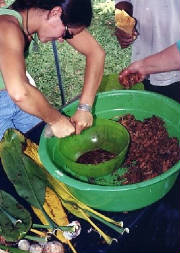
The Mo'omo'o is now subject to
further fermentation. Soak the Mo'omb'o in fresh water until damp, then wrap in Ti leaves (la'i puolo) and put it in a sealed
container. Leave this for about two days then check it to make sure there aren’t any mold and whether the bast is soft
and slimy. The Mo'omo'o may be left in this way from 4 to 5 to 10 days, when the water 'squeezed from the bast is slimy and fibers are soft
to the touch, the material is ready for the second. Begin beating with the I'e kuku (four sided beater).
In Makekau's description of felting
ire says that the Kua was raised about a foot from the ground by means of lauhala pillows, blocks or stones placed at the
ends. The Tapa maker sat down with a basin of water by her side, picked up the club and with two hands began to beat. She
beat from left to right and back. The stuff spread out and became tougher, and to beat it evenly, she change it from right to left etc.. She sprinkled water as she beat and every now and then changed her sitting
position. The finished dart of the Kapa was coming toward her and once in a while she rolled it up. When she was finished
she folded it in two and beat it into one sheet, then she folded the sides to beat the edges straight. When there was nothing
more to do, no mistake to be corrected, no: thick places to be beaten again, no thin places to be filled and nothing whatever
to be done over again) the cloth was finished.
Kaahaina says that many beatings
were required before the Kapa was completed. The second, third and fourth beatings were done each according to the degree
of fineness of the I'e kuku surface used. The first beating was coarse and termed pa'i(pa'i were parallel lines on a beater)
and all mo'omo'o were put through this stage before the finer beatings were applied. This took one days work, material not
being worked on was kept in ti leaves (puolo la'i). The first three stages of beating were done with a longitudinally ribbed
mallet (i'e kuku pepehi‑ho'opa'i). The finishing stage was termed holua and was done with a watermarked surface or with
a very finely ribbed surface (ho'opa'i).
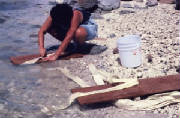
Drying was done in the kahua an
area covered with small pebbles. The sheet was laid out in the morning, weighted with stones along the edges. As the sheet
dried the stones were moved to make sure shrinkage was even and to keep it from tearing.
The sheet of Kapa was then ironed
after the final drying by beating with the smooth side of the beater (mole). It was trimmed square if necessary this was checked
by folding the sheet in four, if it was even the work was counted as satisfactory.
It took five of these to make
a Kuina (quilt) four plain white ones called Iho, and one colored, the outermost, called Kilohana. After the Kilohana had
been dyed and perfumed, it was laid upon the iho and the sides toward the head sewed together with long stitches. The Kapa
was now completed.
The manufacture of the Pa'u and
Malo is different from that of Kapa. The bast was striped and cleaned and beaten at once on the rounded side of the Kua with
the pepehi side of the Hohoa. No moisture is applied. To increase the width pieces are laid with sides overlapping and tapped
at intervals to join them. This process was called paku. To lengthen ends are trimmed even and ends of the new pieces are
overlaid and felted. Young straight Wauke called Wauke Ohi wahich grows to a height without branching was used. This method
is similar to the method used in Fiji to produce lengths of
tapa. The bark is not pulped together as in Kuina Kapa the grain of the bark fiber can still be seen which also attributes
to its strength for used as clothing.